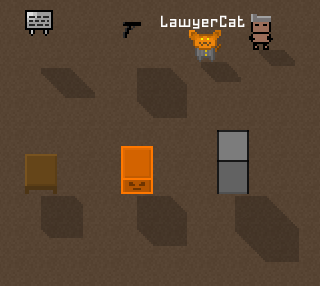
Shadows of tiles (at Z=8) and characters (at Z=0)
While block graphics are much more effective at creating onscreen images, shadows can also be manipulated to this end.
There are however several reasons one might not consider them worth the effort:
- No colour variation or control; shadows are always a partial darkening of whatever colour they fall on.
- Many players will disable shadows, or will not stay still long enough for them to be fully rendered.
- Players will not usually pay attention to shadows themselves, mainly using them to unconsciously interpret solid shapes and surfaces.
- Block shadows are larger than blocks, further reducing the amount of detail they can fit within the game window.
Introduction
In most cases you will be interested in the combined effect of multiple blocks and shadows, rather than fine details.
This guide will focus primarily on shadows cast by box-shaped cell-covering tiles because they are the most useful and convenient.
It will also assume a flat background and ignore shadows that blocks cast on each other.
Basis
- The screen distance between a block and its shadow depends entirely on the difference in Z between the block and the surface on which the shadow is cast.
- The vertical window position can be adjusted independently by changing Y alone, compensating for changes in Z.

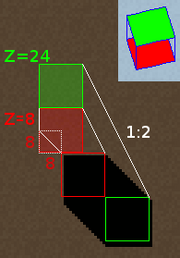
Axis of freedom (Click for animation)
This creates a degree of independence between a block's graphic and its shadow along an oblique angle, which allows an image of one type to be paired with any of several possible arrangements of the other.
The only restriction (apart from rendering limits) is that both graphic types are represented at least once along this axis, with blocks upward of any shadows and shadows downward of any blocks. Either can be minimised to a single unit, but there is no arrangement to conceal all shadows behind blocks.
Methodology
Guide Sketch
Checking the design for problems.
Having decided what shapes you want, make sure that they line up correctly so as to comply with the pairing restriction.
Provided each part of the image made of blocks lines up with a part made of shadow and vice versa, the combined image can be created.
The precision in terms of detail or smoothness depend on resolution, i.e. the scale and number of blocks used.
Block alignment


Altitude-based visual positioning options.
Because blocks can appear in the same window position at different heights, we can use a 2D grid to see which positions are possible.
Blocks must align horizontally with the grid of cells. Vertically however, it is convenient to divide space into 8 pixel steps.
This means that not every change in Z can be exactly matched by a change in Y.
This results in a distinction between even and odd step counts where even aligns vertically with even and odd with odd, but they don't align with each other.
The resulting 2D grid is 8 pixels vertically and 16 pixels horizontally.
Tool Options
Paper

Shadow mapping to a first approximation.
The main challenge of this approach is that you will need to position shadows accurately by hand. If the design is at all complicated, it will be worthwhile to prepare cardboard 'ruler' templates.
- For smaller designs where blocks cover as much or more area than shadows, a single sheet is adequate.
- If multiple blocks are likely to occupy the same visual area (at different altitudes), it will be necessary to use a separate sheet for each altitude plus one to record to overall result. In this case, it might be preferable to use a graphics program.
Graphics Program
You will need a program that supports layers and transparency.
- The main image will have the guide at the bottom, shadow rulers at the top, and one layer for each altitude in between.
- A secondary image contains only block-shadow pairs, one for each altitude on its own layer, which can be easily copied and pasted to the main image.
Procedure
These instructions are not fully explicit but are intended to be descriptive enough for application to both paper and computer with minor amendments.

Using a "shadow ruler" with guide image to work out the best block positions.
- Draw a grid of 2x1 rectangles, or emphasise the appropriate lines on grid paper. Be aware that some blocks may overlap, and you will need space to distinguish between them.
- Draw your design lightly on the grid. It is not necessary to make the design 'blocky' at this stage; the design will be more visible if it doesn't fit exactly, and any compromises can be worked out as you go.
- Draw the blocks and shadows.
To ensure good coverage of both blocks and shadows, start with the outer boundaries, making the north-most block cast the north-most shadow along its axis, and so on all around.
The optimal placements for both edges will only agree about half the time; usually you will need to optimise for one, then place additional blocks to fill in the other.- If using a single sheet, then on each block drawn, write the number of vertical steps at which the block will be placed in-world.
- Otherwise, draw the block on both the guide sheet and the sheet for the altitude at which it will be placed, and the shadow only on the guide sheet. Note that the Z-specific image will be clearer if you draw the bottom face only so that the images don't overlap.
- Convert to ground plan. The constructed image is based on its appearance in the game window, rather than actual coordinates.
For complex designs you will need a modified copy of the main image. By shifting each layer down (+Y) by its Z value in pixels you can make the horizontal coordinates of all layers line up. - Place the blocks.
- For simpler designs it will be possible to set Z and position blocks by eye, using the visible relationships between blocks.
- Otherwise it will be necessary to use a ground plan, setting Z for each layer, but targetting their coordinates at ground level to place them.
- Patching. Even if your design is free of errors, there are subtle rendering details that can result in small lines and holes in the shadow part.
Often this occurs when adjacent shadows correspond to widely separated blocks. Regardless, the solution is to reinforce those shadows with blocks closer to others, or centered on the problem area.